| |
| technic |
| artists |
| links |
| material |
| contact |
| home | bibliography |

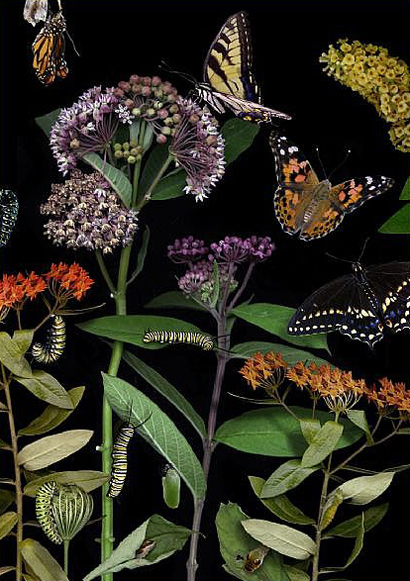
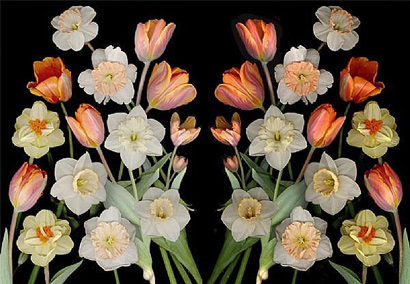
Patri Feher's flowers |
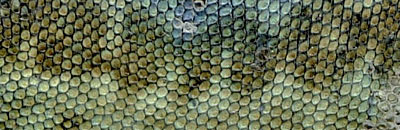
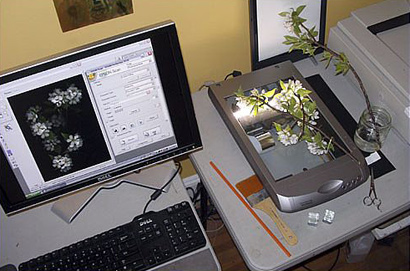
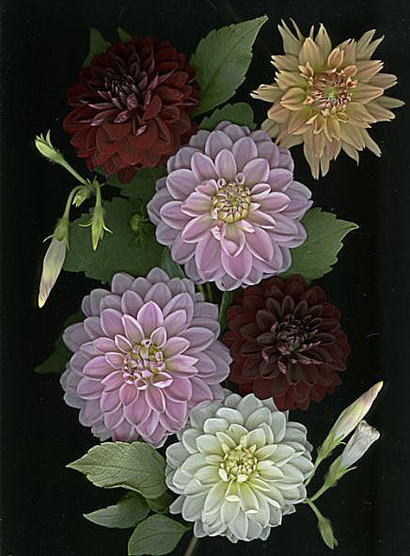
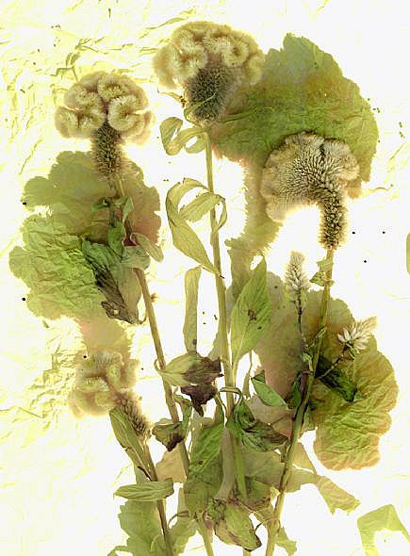
All text and images on this page are copyright of Patri Feher. Collect flowers and live specimens from your garden or use objects d'art, ephemera- or a combination of objects. Scanned botanicals and insects can be printed or displayed for scientific study or decorative artwork. The velvety black background is a result of the scan made with the lid up or removed. Scanning plein air (outdoors) will achieve a blue sky or light background (or any shade if a sheet of translucent tissue paper is placed over the arrangement). Things You’ll Need: Collect objects and arrange them face-down on the glass platen. Select just-cut flowers from your garden or house plants. Light and medium color flowers and objects are the easiest to capture. Dark flowers like the burgundy dahlias seen here are more difficult.
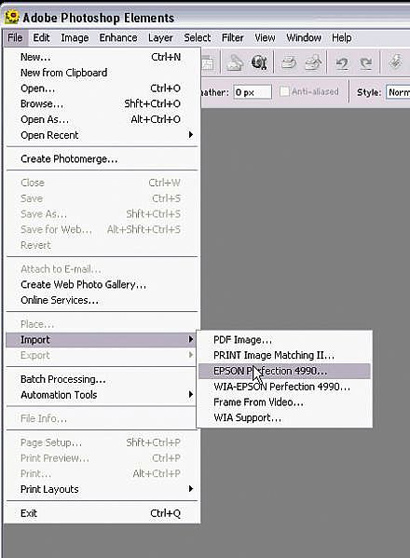
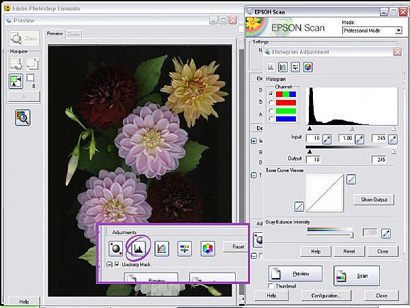
Open the scanner software- visit: File...Import...(select the scanner from the list of input devices). When the scanner Interface is activated CHANGE THE simple MODE TO "PROFESSIONAL". If you are using another brand scanner, change it from "auto" to "MANUAL" (sometimes referred to "ADVANCED") because we want to control every aspect of image modification.
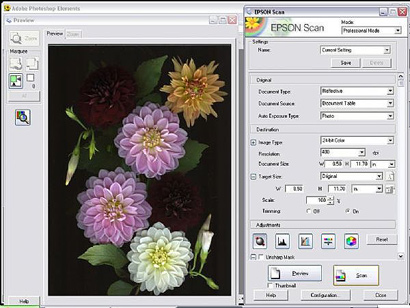
The scanner software can be accessed as a "stand alone" program. When this method is preferred, all of your captures are automatically saved, so be certain to change all of the file saving defaults. Save your original scans in the uncompressed .tiff format- and not as .jpg format images. (You can delete unwanted images and save a duplicate as a smaller .jpg later!) Once the subject matter is ready for scanning, click on "PREVIEW". Adjust the arrangement and preview repeatedly until the placement is perfect.
Usually the default preview is set on "auto-exposure". The Epson software will allow us to make very fine adjustments in both value (shadow and highlight) and color. You'll learn more as you go along… but for now settle for the auto-exposure result OR fine-tune the VALUE histogram. To do this click on that icon and another (adjustment) window opens. We want to create a solid black background with highlight (white or light) areas that retain detail. By trial and error you will learn how to make these adjustments for the "correct" contrast and exposure. Remember… a scanner is essentially a high resolution digital camera. A "good" exposure will have both a solid black and pure white reference point, even if these areas are tiny.
Set the resolution at 300, then click on "SCAN". At 300 dpi (or ppi) the image will be printable at "life size". If scanning a single small flower, increase the resolution. Note: "resolution" has nothing whatsoever to do with image "quality" : it determines the SIZE the image can be printed. 600 resolution=200%
After the scan is complete, CLOSE (don't just minimize the scanner software window!). Your scanned image will appear in the Photoshop workspace. Let's view the picture at 100%. Visit: View… scroll to Actual Pixels. Check the image for goofs and "problem" areas (like too much dust or an object that is out of place). Activate the "Navigator" to easily zoom in and out to examine the image.
SAVE the image if you like it as a .PSD or .TIFF file… do not save it as a .JPG, or ANY other format or the image will be compressed or modified and ruined. SAVE it as (for example) flower-A.psd and not the default "Untitled-1". Return to the scanner window: visit...File...Import...and make additional scans and variations. Tinkering with the color and value controls is a lot of creative fun.
Let's assume you've got a folder full of images you'll want to print or display on your blog or in your cyber gallery. Rule 1 : Always save and "archive" the original image file. ALWAYS MAKE A DUPLICATE COPY TO MODIFY. In Photoshop visit...Image...Duplicate. In Photoshop Elements visit...Image...Duplicate Image. Rename a dupe something like flower_B.psd
To "optimize" or edit a picture to display in a cyber gallery is extremely easy in any Photoshop version. First open the selected image. Now DUPLICATE it. Close the original. Need to adjust the values? Visit PS Elements 2.0: Enhance...Auto Levels. To manually tinker with the shadows/highlights: Enhance...Brightness/Contrast...Levels. Sometimes a scanned image has a greenish cast to it to adjust this visit: Enhance...Auto Color correction. To trim or "crop" PS offers a variety of tools. Try the Crop tool located in the "Tool Box" strip to your left. Retouching: it's a good idea to use the "clone" tool to camoflage any serious dust motes. Where there is a blotch or light streak in the background darken it using the burn or clone tool. Use a delicate hand when retouching! These are very elementary modifications. For more advanced instruction please feel free to contact me through my personal website and I'll direct you to more involved or advanced level modifications.
After you've made the necessary adjustments, the image is still way too big at 300 dpi to display in any browser. DUPLICATE that image again, yes, again. Images for web display shouldn't be wider than 800 pixels, and, more often, 300 to 600 pixels wide. And the format needs to be a .jpg (the best format for a photo). Visit: Image...Image resize. A window opens, in the space where it says "Width" change it to "600 pixels" (or 300, 1025- whatever the width needs to be). The height will be decreased in proportion automatically. Click OK. Next, be certain you are viewing the image at 100% or "Actual Pixel Size". If this is the proper size visit: File...Save For Web. A window opens. Select .JPG as the format. And 60% is usually a good quality choice. Click Save and follow the instructions. The program has optimized your picture and it can now be displayed on any web page. Unfortunately I can only provide a very general overview on this subject due to its complexity. My advice is that it is probably cheaper and less frustrating FOR THE NOVICE to have a "service bureau" that does printmaking for professional photographers and artists print your images than to struggle with frustrating and challenging printers that eat up dollars in ink and paper. "Low end" or "entry level" Epson printers, in particular, provide a very high quality printout - however they are full of quirks and only if you print photo quality images on a regular basis (meaning every day of the week) should you buy one. Epson printers are just too problematic for the "occasional" user or hobbiest. HP printers are the best value and are reliable, however their scanners suck. (So don't buy an all-in-one!) Canon also has a reputation for making fine prints, but their scanners aren't that good either. An "all-in-one" printer/scanner/copier is good for general office activities. I did, a few years ago, get an Epson all-in one (CX5400) for my boyfriend's home office and I must say I made some scanned flowers and some lovely prints with it without the usual frustration. Now, some "low end" printers make lovely prints, but these aren't "archival". The inks are dye and not pigment. The prints may fade when displayed without protection (framed behind acrylic glass). DYE is brighter, but the colors are made with chemicals. PIGMENTS are made from the earth's natural elements and although they last longer, are more expensive. I, personally, don't like to coat my photos with those UV protective sprays. They're stinky and attract dust that sticks to the surface, yuck. So, just pay someone else to make "fine" prints for you. Over-all you will save money. Please feel free to contact me regarding any of the topics related to using your scanner as if it is a camera. Helpful links appear on my How-To pages: http://www.hometown.aol.com/BRGWorkshop/1.html
|

• Jaime Ruas's
liquid painting method >